WizPrint & WizTix
As of 11/14/2021, all Wiztix customers will need to install version 7.0.0+ of Wizprint if they use Wizprint. Wizprint version 7+ will allow for both Internet Explorer or the use of a Chrome Extension. Starting 11/13/2021 you my download the version 7 and use Google Chrome as your primary browser for using WizTix. Please read this whole document before procedding.
*Note this is a MAJOR refactor of WizPrint. Please understand there will be some side effects that we will have to work together to resolve. The first thing you should do is refer to this document and check that all items are installed and review the Debugging section. If there are still issues please contact Ginny
Table of Contents- Overview
- Wizprint - What is it, Why we need it, Why does it break, Where is it Used?
- Install WizPrint version 7
- WizPrint Chrome / Edge Extension
- Internet Explorer Setup
- ActiveX Setup
- Wizprint Debugging
Wizprint - What is it, Why we need it, Why does it break, Where is it Used?
WizPrint solves a problem where users of WizTix can print from multiple printers and select which tickets they wish to print. This is not trivial to accomplish. First it must deal with Printers and Windows. Windows updates can cause Printer Driver Issues. Printer are extenal devices and their configuration is not always simple. They can be unplugged or have communication issues. Printing from Wizprint requires communication across the browser, a desktop program, the database and finally sending the print jobs to the Printer Queue.
In the past this was achieved by using a feature in Internet Explorer called ActiveX which created files on the computer from the browser. The the desktop application, WizPrint was then tasked with watching for changes in the folder. When new files were created it would connect to the database and then it would rebuild the ticket files and send them to the appropriate printer. As you can see this is a complicated process. It has become hard to manage because ActiveX is not secure and Internet Explorer is being phased out. This is not a trivial or cheap thing to fix.

The new version of Wizprint is still complicated, but it uses the latest browser extensions technology to comunicate directly with the desktop Wizprint application. This allows better communication between the browser and the application as well as removing the need to have a folder on your computer where files are created. Another feature of the new WizPrint version 7 is that we have changed the communication between the desktop application and the database. The previous method was not as secure so it is critical to update it. In addition to security updates we have added a status bar to the browser to give the user more information on the status of WizPrint and the extension to increase user awareness that all the technology pieces are working together. Often users would have Windows Printer issues and blame WizPrint. Where in actuality it was Windows Printer configuration that was the issue.
WizPrint functionality exists on 2 pages on the website.
- Sales Records
- Box Office Delivery
Install WizPrint version 7
 Watch a video on how to install WizPrint Version 7
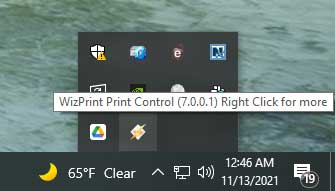
- Shut down thecurrent version of Wizprint by right clicking the lightning icon in the task tray and click Exit.
- Click this link to Install Version 7 of Wizprint.
- Please be aware that the browser may warn about it being dangerous. Please mark to keep the download. It is there to protect you from malware but in this case it is a known download. Once it is downloaded click Setup.exe
- If you have Windows Defender you will need to turn it off for the install. Click Here to read how to turn it off. You can turn it on after the new version is installed.
- Make sure you have your printers setup in WizPrint
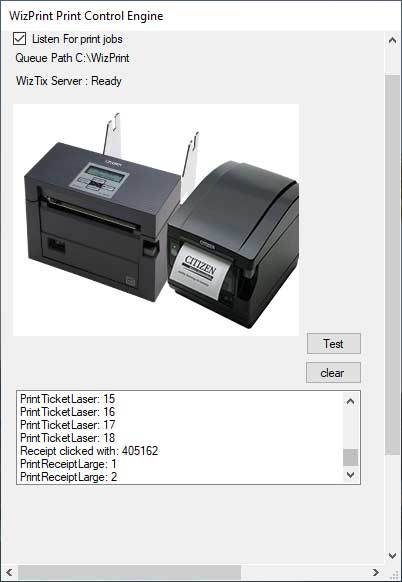
- Right click on the Wizprint Icon / lightning bolt and click Show
- In the menu click Config->Installed Printers
- Select the Printers from the drop downs
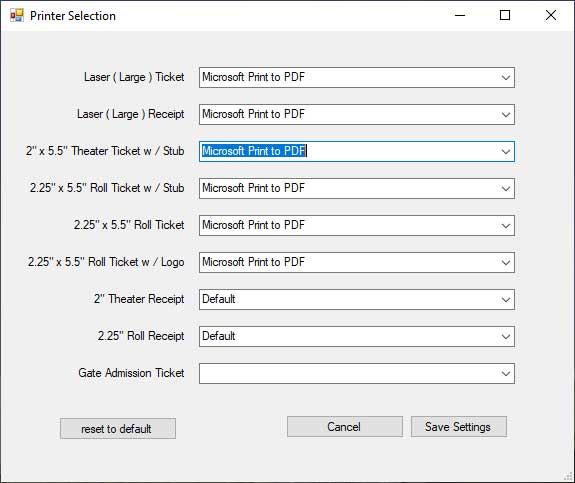
- Click Save
- You should be back on the WinzPrint Screen with the printer picture. Click the Test button and it should print a reciept as long as you set a Reciept Printer in the Installed Printers
- Right click on the Wizprint Icon / lightning bolt and click Show
WizPrint Chrome Extension / Edge Extension
The Chrome / Edge extension replaces the need to use Active X with Internet Explorer. If you have issues with Chrome / Edge you can revert back to using Internet Explorer for the time being but known That Microsoft is working very hard to prevent users from using Internet Explorer. The Extension can be installed on Edge because it is a Chromium based browser.
- Complete the Install of Wizprint Version 7
- Using Chrome or Edge Browser, Install the new
Wizprint Chrome Extension. Click here to go do the Extension install page. For Edge you will have to click "Enable Extensions from the Chrome Web Store to Microsoft Edge" when visiting the
WizPrint Chrome Extension page.
- Make sure you are using the Chrome or Edge Browser. Click Here to find out which Broswer you are using.
- Click the Add to Chrome button
- Make sure WizPrint is Running
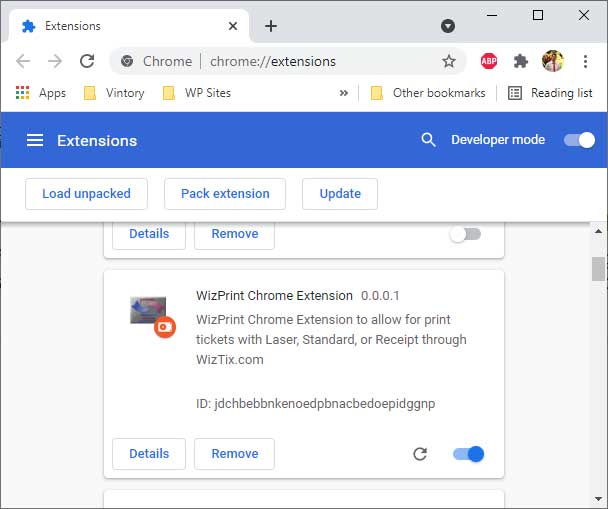
- Make sure the New Chrome or Edge Extension is installed and running.
- Click the 3 dots in Chrome in the upper right. Click More Tools-> Extnsions
- You shoudld see the Extension Installed and Enabled
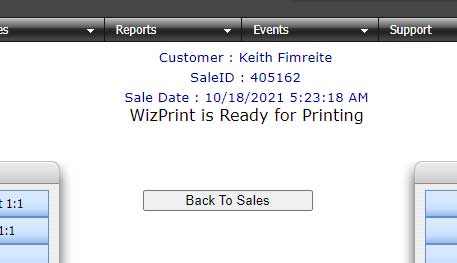
- Go to a Sale and you should see "WizPrint is Ready for Prining" below the Sale Dates. If you see this then you are in Chrome and the Extension is installed.
- If you then click WizPrint on Laser / Reciept you should get it to print.
- Make sure your firewall / security system allows communication on port ws://127.0.0.1:13555. Most users will not have to do this but if there are issues with
the Extension communication with WizPrint this is worth checking.
- Right now there are known issues with certain security systems blocking the Extensions communications. We will be addressing the issue soon. Until then please use Internet Explorer.
- How to open ports in Windows Firewall
- If you see message about Wizprint not being ready. Please refresh the browser page.
- You can check on the debug status of the prints but right clicking on the WizPrint Icon in the task bar -> Click Show.
- Finally Log into Wiztix and go to Sales and test out some tickets using WizPrint.
Internet Explorer Setup (Microsoft will be shutting down IE)
If you wish to continue to use Internet Explorer you may but Microsoft is working hard to prevent continued use of it.
Since "At The Window" is designed to be a speedy process, print spooling has been disabled and both receipts and tickets are printed directly to the printer.
It will be neccesary for you to make your ticket printer the DEFAULT windows printer.
This is accomplished by going to the printers folder, right click the printer and choose MAKE DEFAULT.
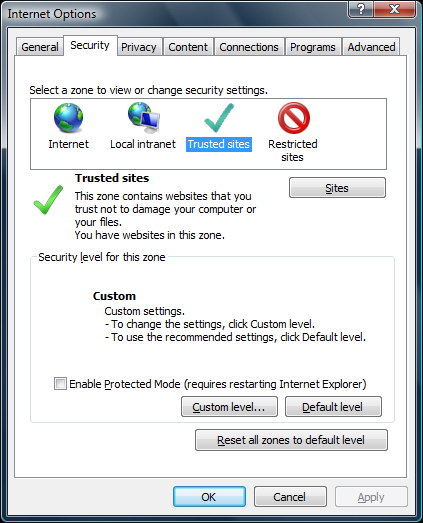
In addition you must enable ActiveX controls in your browser. We recommend that you add our web site to the TRUSTED SITES.
to do this please add our site address like this ( https://www.wiztix.com ). You may then adjust your security level for trusted sites to include support for ActiveX controls.
We use ActiveX controls to suppress the print dialog as we send tickets to the printer.
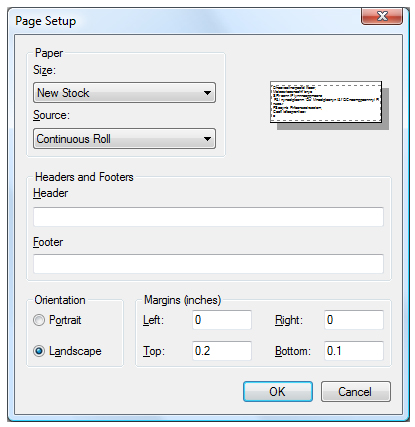
The last step will be to adjust your margins and orientation in your browser. Please open any browser window and choose FILE : PAGE SETUP. Adjust your settings like the image below. Be sure to press the OK button and close your browser to save the settings. You are now ready to use the "At The Window" System.
Active X Setup
It is recommended that you first verify your browser and printer are working properly in this mode. Please allow a reasonable time BEFORE the event begins ( 30 minutes ) to set up and configure your browser for this mode of operation .
- Add https://www.wiztix.com to the list TRUSTED SITES
- Go to to TOOLS : INTERNET OPTIONS ( Internet Explorer)
- Click CUSTOM LEVEL
- Assign these parameters
- Scroll down to the ActiveX controls and plug-ins section
- Under Download Signed ActiveX Controls, select Prompt
- Under Download Unsigned ActiveX Controls, select Prompt
- Under Run ActiveX controls and plug-ins select Enable
- Under Script ActiveX controls marked safe for scripting select Enable
- Click OK to close the Security Settings window (If prompted to verify that you want to change the security settings for this zone click Yes)
- Click OK to close the Internet Options window
- Close and Restart your browser (Internet Explorer)
Wizprint Troubleshooting / Debugging
- Make sure Wizprint is running.
- Make sure there is only 1 instance of WizPrint Running
- Make sure you have your printers setup in WizPrint
- Right click on the Wizprint Icon / lightning bolt and click Show
- In the menu click Config->Installed Printers
- Select the Printers from the drop downs
- Click Save
- You should be back on the WinzPrint Screen with the printer picture. Click the Test button and it should print a reciept as long as you set a Reciept Printer in the Installed Printers
- Make sure you are using Internet Explorer or Chrome with the WizPrint Chrome Extension is Installed
- Microsoft has been forcing Edge and trying to get rid of Internet Explorer. Click here for help.
- If you see Edge or another browser then you need to find where IE is and use that instead. Or use Chrome with the new Chrome Extension0.
- Make sure your printer is on and has paper. Do a test print with a different application.
- Go to Printers & Scanners in the Control Panel Make sure the printer is available and not grayed out. If you get a spooler error follow these steps:
- Go to the Control Panel and click on Devices and Printers and make sure all the printers were enabled.
- Clicked on the printers to try and print a test page it would result in a print spooler error.
- Cick "Run the troubleshooter" and Windows resolved the Spooler error.
- Run Wizprint and configured the printers.
- Make sure your firewall / security system allows communication on port ws://127.0.0.1:13555. Most users will not have to do this but if there are issues with the Extension communication with WizPrint this is worth checking.
- Turn On Pop-Ups or try this to Turn on Javascript for a Site. If you have turned off popups in Chrome or any browser you may see a change in WizTix behavior. Make use the link to make sure popups are enable for WizTix.
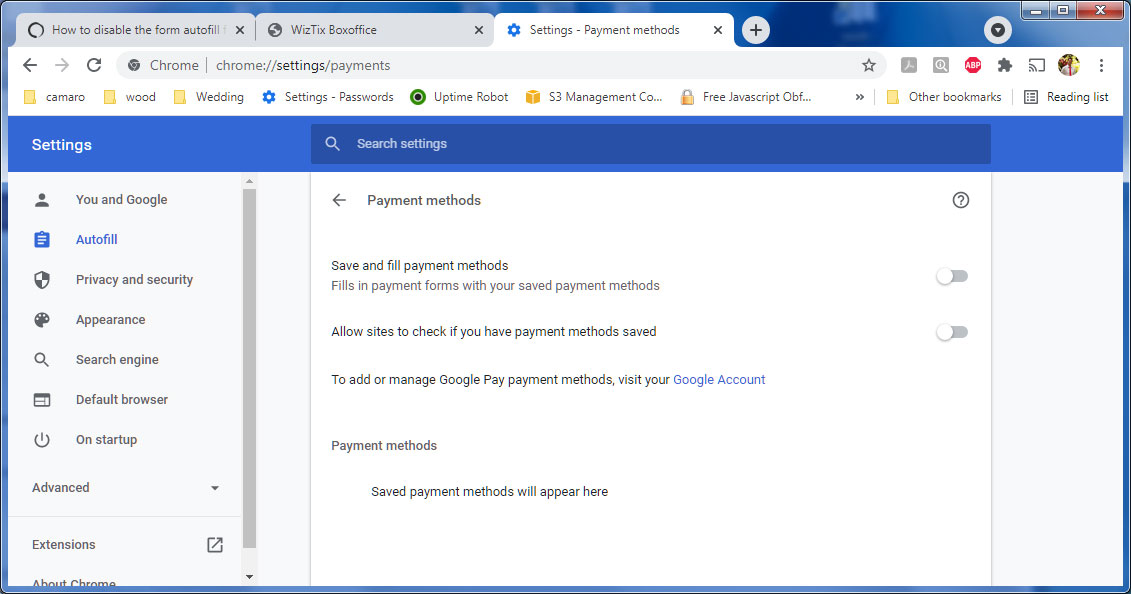
- Turn off Autofill - If chrome is autofilling the credit card information you can turn it off
- TeamViewer Download if Needed. Downlaod and Install, Run Once install.